Home » Kevin Vitali Massachusetts REALTORS-Real Estate Blog » Home Maintenance » 10 Tips To Prevent Ice Damming
10 Tips To Prevent Ice Damming
 Now that winter is upon us in New England, many homeowners have to worry about destructive ice dams forming at the edge of their roof.
Ice dams can be a minor nuisance to being a fll blown issue that can injure your family and damage your home.
Ice damming often comes with icicles. Icicles and even chunks of ice can fall from your home and can cause injury.
It can also cause water to penetrate slowly into your home. The slow penetration of water can create the perfect environment for dangerous mold to grow undetected for long periods of time.
An ice dam may cause water staining on your ceilings and walls. Or, worse, it can actually create bowing, sagging and collapse of drywall and plaster.
It is important to monitor and maintain your home’s roof in the winter to keep ice dams from at the edge of your roof.
The best way to avoid damage to your home from ice damming is to take steps to prevent it from occurring in the first place.
What Is An Ice Dam?
An ice dam is ice that has formed a ridge at the edge of your roof.
The ridge of ice as it gets larger and creates a “dam”. The dam prevents the water runoff from the melting snow to drain off the edge of the roof into a gutter or to the ground. The water pools behind the ice dam and can eventually penetrate underneath the shingles into the home.
As pretty as icicles are on the edge of a roofline, they also may be an indication that ice damming is occurring at the edge of the roof.
What Causes Ice Damming On The Roof?
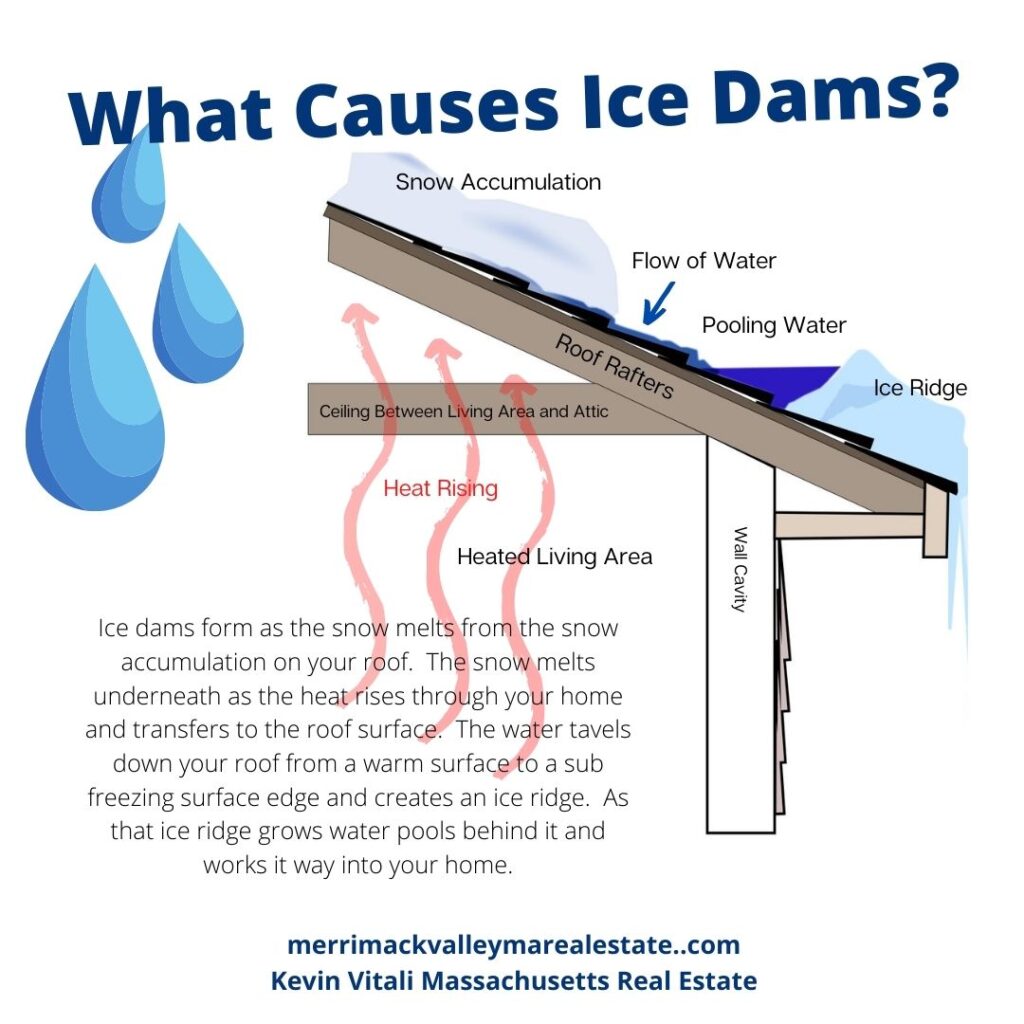
Ice damming happens as the snow melts, sitting on top of your roof.
Some snow on your roof melts naturally, much of the melting snow is caused by the heat transfer from your home’s interior to exterior.
Think about it.
You heat the living area of your home. And, we all know, heat rises. 33% of a homes heat loss is through the ceiling/roof.
So where does that heat go?
It goes up!! Meaning your attic space and heats the underside of your roof than melts the snow accumulation on your roof from underneath.
The problem lies in as the snow melts and drains off the roof it will hit the edge of the roof, that is either partially or fully protected from the heat loss in your home. The water goes from an area of your roof that is above 32° to an area of the roof that is below 32°. As it travels into the sub freezing area of your roof toward the edge it starts to freeze and form a ridge or dam.
Eventually, that dam grows. As it gets larger, water pools behind the ice dam. Shingles are meant to protect from water shedding downward. But as that pool grows and sits on the roof it work its way upward under the shingles.
Factors Contributing To Ice Dams On Your Roof
There are a variety of factors that contribute to the build up of ice at your roof’s edge. Some factors you may have control over, while others you may not.
Poor Attic Insulation
Poor attic insulation and attic ventilation are two major factors. Let’s start with attic insulation.
Heat rises. As you heat your house, the heated air is going to want to work its way up into the attic through every crack and crevice. It’s the heat transfer that contributes greatly to the melting of snow on your home’s roof.
The better insulation you have in your attic, the more you can slow down the transfer of heat.
Inadequate Ventilation
Ventilation serves two purposes. One is to keep moisture out of the attic. And, two, to allow the hot air to escape.
There is no way to completely insulate your attic and eliminate the heat transfer. By ventilating your attic properly, it allows the escape of hot air while drawing in cool air. This passively cools the attic space and slows the transfer of heat. Proper ventilation in many homes in New England include adequate soffit vents under the eaves of a roof to draw in the cool air and a ridge vent along the entire peak to allow hot air to escape.
Roof Design
There are several design aspects that contribute to whether ice dams will form or not.
First is the pitch. The steeper the pitch, the less likely a big ice dam will form and cause water to back up under the shingles. Plus, water will shed faster on a steeper roof than a flatter roof, giving the water time to drain off the building before freezing.
Second, the complexity of the roof plays into the formation of ice dams. Roofs with lots of different peaks and valleys give an opportunity for water to ice up. Every valley is an opportunity for snow and ice to build up and those valleys are often poorly ventilated and often difficult to insulate.
Last, we already talked about ventilation. A newer home is more likely to have better ventilation than an older home as building codes become more stringent and make homes more energy efficient.
Tip- Poor insulation and ventilation is an area of your home that home inspectors will point out as a deficiency when it come time to sell your home.
The Amount of Snow
Ice damming will be more likely to arise when there is a heavy snow fall. Believe it or not, snow is a pretty decent insulator. Every inch of snow is equivalent to 1 R-Value. So 15 inches of snow on your roof creates an R-Value of 15.
Considering some older home barely have that for insulation in the attic making snow a so-so insulator.
As the heat rises and transfers through your roofing system, the snow helps hold in the heat and melts the snow accumulation from the bottom up.
Ice dams can occur along your roof’s edge even in small amounts, but it is more likely to occur during or after heavy snow storms.
The Weather
Extreme thaws and freezes can definitely be a contributing factor to ice dams. Those days that heat up and cause the snow to melt quickly, and then the evening plunges into sub-zero temperatures, create a perfect environment for ice dams.
10 Tips To Avoid Ice Damming Along The Edge of Your Roof
1- Insulate
Look at the insulation in your attic floor or roof. Here in Massachusetts, you want an R-Value of 49-60 in your attic. Older homes, especially pre-1980 can have very poor attic insulation. I go in plenty of older homes and home prior to 1950 that can have attic or attic flooring insulation that is almost non-existent.
Consider bringing in a professional if you feel you have poor insulation and you are constantly battling ice dams on your roof. While upgrading your home’s insulation is not a glamorous remodeling project, it is certainly one that can have a big pay-off.
The beloved cape home is a New England classic that is notirious for ice dams because second floors are often built right under the roof line with improper insulation (and ventilation)
2- Ventilate
Again, the older the home, the less ventilation it will have. Work on creating as much air flow along the underside of the roof sheathing as possible.
When it’s time to replace your roof, it is also a good time to maximize your roof’s ventilation. Whenever possible, install a ridge vent with plenty of under soffit vents.
Talk to your roofing professional about how to effectively ventilate your attic.
3- Unclog Gutters
Clogged gutters, that prevent the flow of melting snow, will quickly back up and most certainly cause ice dams. Keep your gutters free from debris.
Cleaning your gutters should be a must for your fall maintenance list.
4- Cover Your Attic Access
Many homes have pull downstairs or hatches that can be accessed with a ladder. There are handy attic pull down insulating covers you can use not only for pull downs but hatches as well.
The covers can range in cost between about $40 to $200. A cover can have an insulation R-Value of around 38 but, it also prevents the cold air from rising into the attic.
Even if you have a walk-up attic with a regular door, treat it like it is an entrance to the outside. Often walk up attics use regular interior doors. Use an insulated door and weather seal around the door.
5- Seal And Insulate Duct Work
Many newer homes have split heating systems and/or ductwork for forced hot air heating systems in the attic. Make sure all duct work is properly sealed and insulated to prevent any unnecessary heat from leaking into the attic space and adding to the heat already escaping into the space.
6- Do Not Vent Bathrooms And Kitchens Directly Into The Attic
Any vents in your home should be vented to the outside of the house. This includes the overhead bathroom fans, exhaust hoods for kitchens and dryer vents. It is not uncommon for many homes to have bathroom vents just ending in the attic and not fully exhausted to the exterior.
Check and make sure any vents in your home are properly ventilating to the exterior of your home and not dumping warm moist air into your attic.
7- Use Ice and Water Shield
Whenever you install shingles or replace shingles, a membrane called ice and water shield should be applied to the bottom three or four feet from the roof’s edge.
Shingles are meant to for water to flow down and will fully protect a roof when the flow is headed down. When water backs up, because of an ice dam, the water can get under the shingles and penetrate other parts of the roofing system.
Ice and water shield protect the sub-surface of your roof if ice damming should happen.
8- Seal Attic Air Leaks
Anything that is cut into your sealing from the living area to the attic is a potential for an air leak. It is actually amazing how even a small hole or crack can send warm air quickly flowing into your attic.
Recessed light cans, junction boxes, stack pipes, chimneys, electric wires and conduits, etc…. can all be a source of a significant amount of warm air rising into the attic.
Effectively seal any gaps with expanding foam. For electrical equipment that could generate heat, use fire retardant foam. Older recessed light fixtures should be replaced with airtight insulated cans.
9- Remove The Snow
Remove the accumulation of snow from the roof by shoveling or using a roof rake. Often removing the bottom three or four feet at the foofs adge will undoubtedly help and can be accomplished with a roof rake.
Removing the snow from your roof can be a dangerous task that can also cause significant damage to your roof. Consider hiring a professional to prevent injury and minimize damage.

10- Heat Cables
When all else fails, consider using heat cable at your roof’s edge and problematic valleys. The cables melt the ice in the dams and create channels for the water to flow freely.
Heat cables are expensive and should be a last resort in preventing ice dams.
Removing An Ice Dam
If you happen to get an ice dam what do you do?
Before having to remove an ice dam try to prevent an ice dam from forming in the first place. But if you get an ice dam how do you remove it?
Consider hiring a professional for ice dam removal. Working on a ladder or on the roof in general is dangerous, but now add slippery snow and ice and you could have a disaster on your hands.
Don’t just go hacking at it and pulling off the ice chunks you will damage your roof very quickly.
There are several things you can do though.
Remove as much snow from the roof as possible. Remember, thick snow loads hold in the heat, plus you will lessen the flow of water.
Carefully chisel channels through the ice to allow the water to flow of the edge of the roof.
Break Out The Pantyhose and Bust Up That Ice Dam!!
Did I say break out the pantyhose?
I did! The legs of the pantyhose can be used to make a tub filled with calcium chloride that is laid across the ice to melt the ice and create channels for the water to flow off the roof into your gutter or to the ground.
Make sure you use calcium chloride to prevent damage to your roof and minimize damage to your foundation plantings.
Many of the tips preventing ice dams, also have the added benefit of making your home more energy efficient and are upgrade projects that can increase your homes value. Protect your home and save money!!
Other Real Estate Resources
- What are HOA special assessments? A special assessment is a charge levied against condominium owners to help fullfill a budget and commonly occurs when their are large capitol impovement to be made or unexpected repairs.
- When it comes time to buy a home you certainly want to make sure you get a fair deal. So how do you identify an overpriced home? First start by hiring a REALTOR that will give you an opinion of value and provide the data to back it up.
- In this crazy seller’s market, its possible the home you put undagreement may fall short in its appraisal. Learn why this happens and how to work around an appraisal gap.
- When we talk about staging a home, don’t forget the closets—especially the master closet. Get tips on staging a bedroom closet.
10 Tips To Prevent Ice Damming is provided by Kevin Vitali of Real Broker. If you would like to sell or buy a home, give me a call at 978-360-0422 and let’s get the process started.
Real Estate Services in the following areas: Northeast Massachusetts, Merrimack Valley, North Shore and Metrowest. Including the following communities and the surrounding areas- Amesbury, Andover, Billerica, Burlington, Chelmsford, Dracut, Groveland, Haverhill, Lowell, Melrose, Merrimac, Methuen, Middleton, North Andover, North Reading, Reading, Stoneham, Tewksbury, Tyngsborough, Wakefield, Wilmington, Westford